|
|
|
|
|
|
|
|
|
|
|
Loading & Balancing Telescopes
For Giro, altaz, and GEM type EQ mounts.
A "White-Paper" how-to for the layperson - D. Masters/Tech2000
|
|
|
|
|
|
|
|
|
|
|
Summary:
Many telescope users have not been shown the basic sequence to load a telescope mount with instruments and counterweights. This paper will do that, and describe fundamentals of balance, which are so important for the simple pleasure of visual use and particularly critical during imaging work. The examples are using a Giro II DX altaz mount modified by Tech2000 for loading beyond its normal limits, though much of the information here also applies to any other altaz mount, including Dobs, and most equatorials too!
Background:
Loading and balancing any telescope mount in an incorrect sequence can produce results that range from "So what's the big deal my scope swung itself into the tripod leg?", and "My refractor went by itself up past vertical but the diagonal and binoviewer held - and both Naglers dropped out!", to "My tripod toppled over and smashed my 6-inch APO onto the concrete observing deck!". It does happen - these stories are real - don't let it happen to you! Rule-of-thumb... "The larger the weight - The more risk you take".
Telescope users with many differing makes and styles of telescope mounts call us here at Tech2000 hoping we will offer to "fix" their suspect mount or drive problem. Not getting the answers they wanted from the original dealer or manufacturer support line, where the usual conclusion is "send it to the service center". Too often the service center finds nothing wrong and sends it back. Delays, service charges, freighting costs, and frustration, are all that resulted. In a rather startling number of cases we have heard, we solved the problem on the phone by repeating one of the mantras well-known by experienced operators... load it up right to begin with then balance, balance, balance.
No one ever showed you? Me too. But now read on and get it for yourself!
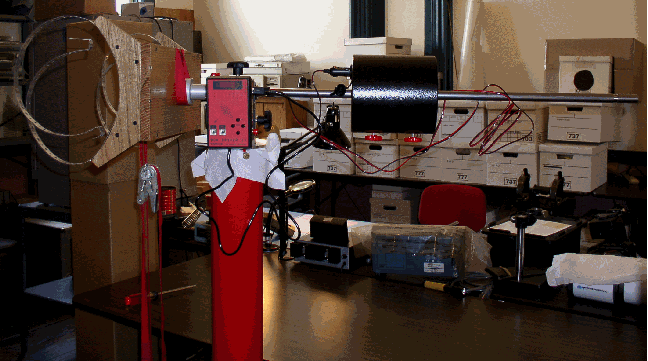
A Trial Setup:
Nothing like an exotic laboratory setup to catch the eye and start you thinking... its really quite a lot simpler than it looks, think of it as "brain-food". Left-to-right...
- Oak hardwood cradle user-supplied for a 14-5/8" Newtonian 37Lb tube assembly (incl. camera weight).
- Silver Giro II DX hub. Red cargo strap looped around it and over cradle for load testing.
- Tech2000 GiroDrive controller affixed to the driveunit on the Giro head behind it.
- Tech2000 aluminum Quick-Draw pier under, the white tissue seen prevents marring during tests.
- 1-meter precision-ground single shaft (20mm dia) runs from the tip of the hubarm on left, out to the right.
- 22Lb Tech2000 "PowerWeight" with cig-lighter cord plugged in and dual red clamp knobs under it.
- The second-instrument arm hub is not installed here, it will slide and lock anywhere along the shaft out to the end-tip where a groove in the shaft can be seen that prevents loosened arm hubs from dropping off.
- Various interconnect and monitoring wires and instrumentation, undressed and untidy just for testing.
|
|
|
|
|
|
|
|
|
|
|
|
|
|

|
|
|
|
|
For Heavy Loads - Inside The Giro Head:
The Giro is dismantled & cleaned. Then the 5000 LB needle bearing thrust rollers are installed in their cage with a steel ring race underneath, the base having been precision machined to accept this as seen in this pic. The original altitude shaft is removed and replaced with the precision ground shaft shown up to 39" (1M) in any length. This allows far heavier loads than using the normal thread-in 9.7" shaft extensions since such threads could shear off and also run eccentric (non-true) when the instrument is revolved in altitude. All linings are then "compounded" with surface polishing then graphite coated, and packed with high viscosity white lithium grease loaded with Teflon microparticles. The job is done by Tech2000 at $199. On the test mount above with a total of 83 Lbs on the pier it moves like silk-on-butter. Again - proper balance is a key factor!
|
|
|
|
|
|
|
|
|
|
|
|
|
ENOUGH WITH THE PRELIMINARIES ~ LET'S MOUNT A SCOPE !
Here's the cheat-sheet on what you will do:
Setup mount, load c'wt, load scope, balance azimuth (Ra), balance tube at vertical (Dec), balance tube at horizon (Dec), repeat balance checks again until all good, mark the location spots and make any changes so you can do it again faster and faster each time. The details are outlined below.
Loading:
1. Set your tripod or pier legs on firm level ground and lock all tensioners. A wider footprint for tripod legs will be more stable both for wiggle-reduction during use, and toppling risks during mountup and use. Grassy areas are best for leg bite and also for observing (due to thermal wafting), concrete and similar slippery surfaces could allow the leg contact to spread by itself unevenly under heavy loads. For mounts with goto or when you will be imaging, press the foot contact points into sod well or clear out a bit (like a divot - this is allowed in the name of science as well as golf) so as to avoid slow uneven sinking over the next hours and the spongy-bounce of sod. Best if you can load up first then level after some compression time has passed, use the Tech2000 leveler pad set for dialing a perfect level anytime after the mount is erected.
2. Attach the mount head to the tripod. Snug it down securely. It will still flex until all is balanced.
3. Swivel the counterweight shaft over one of the mount legs. This will avoid toppling if the counterweights are heavy. GEM users: swing the counterweight shaft over the North leg (of course this is the lowest point that the shaft tip will go). Tighten both of the the axis-shaft rotation locks. If you have more than one counterweight then add the heaviest one now and add the lighter one later after the instrument is on. Move the weight as far as it will go toward the mount head and tighten it in place there temporarily.
4. Mount your main instrument tightly and unlock both axis tensioners or locks to let it swing freely in any direction. Watch out now - keep a hand on the equipment - this is where there may be a tendency for the tripod to topple or the tube assembly to swing by itself with undesirable consequences! At this time it is best to swivel the structure in azimuth so that the heaviest side (the tube assembly) is over a mount leg, GEM users cannot do this.
Balancing:
1. Balance AZ. Move the counterweight outward to balance the load. Your first clue will be that it becomes much easier to rotate the structure in azimuth. You will be able to "hunt" for the best-balanced weight position by rotating the counterweight shaft by hand directly in each direction a little. The tube assembly may want to rotate itself if it is not altitude-balanced already, but that is OK so long as there is no serious consequence - ignore that or lock the altitude shaft tensioner again if necessary to prevent incidental damage to your scope. If your setup requires a second weight, now is the time to add it. GEM users: first loosen the Ra axis lock then rotate the Ra axis (also called polar axis) so the counterweight shaft is parallel to the ground - the counterweight shaft does not rotate on GEM mounts like altaz axles do, but it is easy to know when balance is good - then lock the axis for the next step.
2. Balance alt. - tube vertical.
|
|
|
|
|
|
|
|
|
|
|
|
|
|
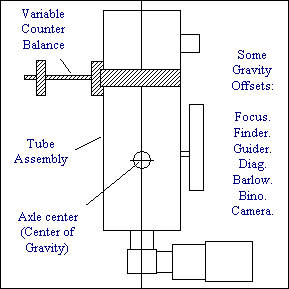
Any weight that is not on the centerline of rotation shown will cause a vertical imbalance condition. If all of the potential gravity offsets shown were truly centered on the vertical axis there would be no tendency for the scope to rotate. This is why equatorial mount rings have threaded holes on the top which are centered on this line. Yet many variances occur with imbalance in this position on all telescopes. You could apply a fixed weight anywhere up or down from the position shown, but when you change an ocular or remove a camera then it will not be correct and you have to change the weight for every single circumstance. The most flexible solution is the variable counterbalance shown. Make one or get it at Tech2000 $49. Use a threaded rod fixed into a U-block and mount it with a strap, and a 1 LB threaded weight to vary the balance position (or thread on several of them if the load to balance is that far off). Don't use metal parts in contact with the tube - scratching is a no-no. Noteworthy: since a Giro axle turns with the tube, and the Tech2000 PowerWeights have an intentional eccentric radial gravity (heavier at the clamp knobs angle), you can take up some or all of this error by merely rotating the counterweight!
|
|
|
|
|
|
|
|
|
|
|
|
|
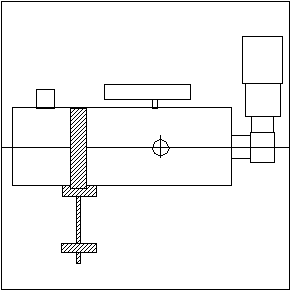
3. Balance Alt. - tube horizontal
|
|
|
|
|
|
|
|
|
|
|
|
|
|
Now the easy part everyone knows. Most telescopes have rings, rail, a clamp, or cradle mountings to allow shifting of the tube to create a balance condition. In the horizontal position shown that is fine, and many people try to compensate for step 2 above by sliding the tube while pointing at maybe a 45-degree midpoint, ignoring the consequences at 0 or 90 degrees - sometimes to their peril! But now you can see that if the tube can not be balanced well at this horizontal position (say your tube is short and you run out of travel), then you can still move the variable counter balance along the tube, and even jump past support rings or clamshell clamps to get to the other end of the tube - and no matter what you do here it will make no difference to the vertical condition in step 2! Once you really get this picture then you will understand that when vertical and horizontal are good there is no problem in-between. Think of it like a bicycle wheel - once it's balanced there is no problem for the 360. This is the crux of most problems with commercial telescopes, drives, mountings, and imaging anomalies.
|
|
|
|
|
|
|
|
|
|
|
|
|
4. Repeat and mark. You should check the azimuth and the two altitude balances again just as a matter of professional pride now that you have the knowledge. And do it this way every time you set up to make it just as routine as remembering to bring your oculars. When you are getting good performance then place small ink marker dots on shafts & tube/rings etc. to act as an index location for next time. Its these little things you do and rehearse that are the "meat" of repeating success in your outings, whether visual brainless immersive joy or aggressive technical intent. Did you have to crawl before you walked? Its all about balance and doesn't take much time to feel. It gets easy later - but you already know that!
|
|
|
|
|
|
|
|